

 With re-purposed thin clients there may be an occasion where having an attached hard disk is useful.
This can provide more storage space than DOM or Compact Flash card and is also far more suited to an
application where the stored data changes frequently. (Remember flash-based storage writes more slowly
than it reads and does have a limited number of write cycles). The obvious candidates here are either
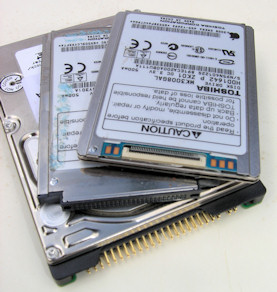
laptop sized 2.5" drives or iPod/MP3 player 1.8" drives. If your particular application is
mission critical or if you'll be in trouble should the hard drive fail go out and buy a new drive and read
no further.
With re-purposed thin clients there may be an occasion where having an attached hard disk is useful.
This can provide more storage space than DOM or Compact Flash card and is also far more suited to an
application where the stored data changes frequently. (Remember flash-based storage writes more slowly
than it reads and does have a limited number of write cycles). The obvious candidates here are either
laptop sized 2.5" drives or iPod/MP3 player 1.8" drives. If your particular application is
mission critical or if you'll be in trouble should the hard drive fail go out and buy a new drive and read
no further.
In the spirit of this website I'm describing what I've done with some cheap cast-off drives bought from eBay. For example a while ago I bought 5 x 30GB 1.8" drives for £10 and a 20GB Toshiba drive for 0.99p. The listings have since disappeared off ebay but I think the 30GB drives were described as "..don't work in the iPod but apparently do when connected to a PC". As always with eBay items like these I suggest you assume the worst and don't spend more than you can afford to lose.
Cheap drives such as these obviously may have problems (why else are they cheap!) but hopefully will still be usable. In order to be useful it is essential that the boot sector can be read. After that the hope is that the errors are clustered around specific areas of the disk. If so we can partition drive in such a way that we keep well clear of the bad areas and maybe still have a good percentage of the drive's capacity still available to us.
 Unfortunately modern technology can work against us here. In the past there was a one-to-one mapping between
the read request for sector N (or track/head/sector) and the physical sector on the disk and bad block
management was handled at the file system level. These days, with SMART (Self Monitoring Analysis and
Reporting Technology), the bad block handling is automatically handled within the drive. For now I just accept
this, but it would be nice to be able to turn it off and subsequently reset some of the data. I assume the
manufacturers have such a utility on the production line but in no way available to Joe Public.
Unfortunately modern technology can work against us here. In the past there was a one-to-one mapping between
the read request for sector N (or track/head/sector) and the physical sector on the disk and bad block
management was handled at the file system level. These days, with SMART (Self Monitoring Analysis and
Reporting Technology), the bad block handling is automatically handled within the drive. For now I just accept
this, but it would be nice to be able to turn it off and subsequently reset some of the data. I assume the
manufacturers have such a utility on the production line but in no way available to Joe Public.
We also need to bear in mind that system level drivers and file systems also use various performance optimisation strategies that read ahead or read multiple blocks at a time. This can cause problems with strategies (such as that used by Windows checkdsk?) that just lock out bad blocks from the filing system. Whilst the filing system may not use say block 1678, that's no help if the low-level driver, when asked to read data near it, decides to buffer blocks 1675 thru 1685.
These days disk drives have substantial capacities so we don't need to eek out every last byte from them, so my strategy is to:
Note: This will only work if the errors are reasonably clustered. If they are scattered right across the drive then you should probably bin it.
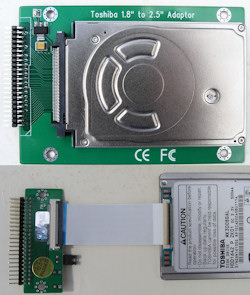 You'll need to interface the drives to the (usually) 44-pin IDE connector on the thin client. With the
2.5" drives this is no problem - it's just a straight cable. With the 1.8" drives it's back to eBay.
If you have the patience then buying direct from China is fine - that's generally how I purchase most of my
adaptors. If you're impatient then there will no doubt be somebody in-country supplying the same thing but
at a premium.
You'll need to interface the drives to the (usually) 44-pin IDE connector on the thin client. With the
2.5" drives this is no problem - it's just a straight cable. With the 1.8" drives it's back to eBay.
If you have the patience then buying direct from China is fine - that's generally how I purchase most of my
adaptors. If you're impatient then there will no doubt be somebody in-country supplying the same thing but
at a premium.
The Toshiba MK3008GAL's have a ZIF (Zero Insertion Force) connector whilst the 20GB MK2003GAH had a more conventional style of connector. In each case you need a suitable adaptor to get to a 44-pin IDE plug.
 You can do a preliminary check using a USB-IDE adaptor, but I find it is best to connect the drive directly
to an IDE interface. When it comes to checking the drive out the direct IDE connect is much faster.
You also get the SMART information - if you have any interest in it.
You can do a preliminary check using a USB-IDE adaptor, but I find it is best to connect the drive directly
to an IDE interface. When it comes to checking the drive out the direct IDE connect is much faster.
You also get the SMART information - if you have any interest in it.
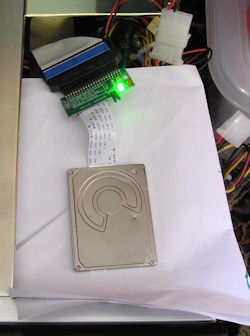
For this I use my main Linux box that is currently running Fedora 13. This has a hard drive (with Fedora) on IDE0 and DVD drive on IDE1. I just take the lid off, unplug the cable from the DVD drive, and connect that to the drive under test via a 40-pin to 44-pin adaptor. A spare power connector in the box provides the necessary power. Having connected everything up power the system up as usual. See photo on the left. Note the sheet of paper on top of the DVD drive to ensure nothing is inadvertently shorted out by its metal case!
Fedora 13 knows all about SMART drives. If you're lucky everything will be as normal when you log in. If you're not you'll be presented with a message about a knackered drive. (See above).
To scan the drive I use the Linux badblocks utility. A good starting point here is the simple command:
#badblocks -o serialnumber -s /dev/sdb
The -o option writes the badblock list to an output file. I use the drive's serial number as the name of the file - it's a good way of making sure you know which record belongs to which drive. The -s option gives you a progress report. By default the program runs with 1K blocks but you can change that if you wish.
The scan can take some time to complete, or if you're unlucky, a very long time. In the latter case it might be worth adopting plan B.
A drive of mine was well behaved in that I got a list of bad blocks in a reasonable time and when I looked at the file there were 78 recorded bad blocks: 110720, 110744, 110745....111098, 111099. So crudely there was one bad area on the disk starting about 100MB in and ending maybe 1MB later. This was easy to deal with. Fire up fdisk and create an initial partition at the start of the disk 200MB in size. That way we know that the bad area easily lies within the first partition and what's a lost 200MB in 30GB? I set the partition type to 0. So a working 30GB 1.8" hard disk for ~£2 - not bad!
Having subsequently set up the other (working) partitions on the disk it is worth rerunning badblocks on them to ensure that your calculations were correct and the 'good' partitions are error free.
If you have lots of errors the scan progress will be slooooow. In this case it might be best to adopt an iterative approach. Start by using fdisk to partition the hard disk into four equal partitions and then run badblocks on each in turn. The only problem with this approach is that badblocks reports bad block numbers relative to the start of what it is scanning. Thus, when scanning the raw device (eg /dev/sdb) it is relative to the start of the disk. If you're scanning /dev/sdb2 then it is relative to the start of the second partition. In determining exactly where the bad blocks are you'll have add that offset on.
By default badblocks uses a block size of 1024 bytes (2 sectors) and reads 64 blocks at a time. As we're not after fine grained resolution here we can also save time by increasing the block size significantly in the hope that, as soon it finds a sector with an error in it, it doesn't try to read any more sectors in that block. In a non-exhaustive test on an error-filled 10GB partition I found this approach did indeed drop the scan time by half from around 3 hours to an hour-and-a-half. The modified command was:
#badblocks -o "serialnumber-p2-1M" -b 1048576 -c 1 -s /dev/sdb2
Here I've qualified serial number with the partition number and the block size I used.