

Plug your pen drive into a USB port on your computer. Note the drive letter that windows assigns to it. This is critical. This drive is going to be modified so you need to be sure that you're installing to the right drive and not screwing up your main system or any other drives in any way. core2usb is actually quite helpful here as it has various safeguards built into it to prevent you making a mistake.
core2usb does not offer the option to format your pendrive. If the pendrive needs to be formatted you'll have to do that yourself - either on another system or using the inbuilt Windows disk tools. An easy option, at least in Windows 7, is to right click on it in Explorer and then select Format.. from the list of drop down options. Next select FAT or FAT32 as the format option.

As an added safeguard, core2usb will only copy the system over to an empty pendrive. I assume this added check is there because, when it runs, it is going to install the syslinux boot loader on the pendrive. If you've just formatted the pendrive it will be empty. If it isn't you'll have to delete the current contents.
 Having got your pendrive ready run core2usb. This brings up the opening screen shown left.
There will be brief pause when the application starts whilst it determines what removable drives
there are in your system. You'll find these listed in the message box.
Having got your pendrive ready run core2usb. This brings up the opening screen shown left.
There will be brief pause when the application starts whilst it determines what removable drives
there are in your system. You'll find these listed in the message box.
NB The program looks as though it just steps through the required sequence of events. If you plug in a pendrive after starting core2usb it won't appear in the list. Once you've plugged it in you need to exit the program and start again.
 Next click on the BROWSE button to bring up the standard windows explorer style window and
locate and select the Tiny Core ISO file. In my case it is TinyCore-4.7.6.iso which is
sitting in my downloads directory.
Next click on the BROWSE button to bring up the standard windows explorer style window and
locate and select the Tiny Core ISO file. In my case it is TinyCore-4.7.6.iso which is
sitting in my downloads directory.
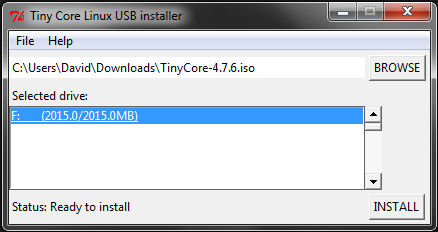 Next double click on the pendrive where the files will be installed. In this example there is
only one - a 2GB pendrive which is shown as drive F:. Having selected it the 'Status' line at
the bottom of the window is updated and the INSTALL button becomes active.
Next double click on the pendrive where the files will be installed. In this example there is
only one - a 2GB pendrive which is shown as drive F:. Having selected it the 'Status' line at
the bottom of the window is updated and the INSTALL button becomes active.
 The program then copies the files from the ISO image across to the pendrive and installs the
syslinux boot loader. Whilst it is doing it the 'Status' line shows the current operation.
The program then copies the files from the ISO image across to the pendrive and installs the
syslinux boot loader. Whilst it is doing it the 'Status' line shows the current operation.
 At the end it should report success. Now remove and label your pendrive. That's all there is to it.
[Back]