

To start with I should say you shouldn't really have any need to disassemble the t180 past the foot. It hasn't been designed to come apart easily, and once apart there is nothing you can change/replace.
 My unit came with what I would describe as an 'accessory foot'. There is a USB connected Wireless dongle
fitted inside it. Judging from the images of the t180 on the web this foot is an extra.
My unit came with what I would describe as an 'accessory foot'. There is a USB connected Wireless dongle
fitted inside it. Judging from the images of the t180 on the web this foot is an extra.
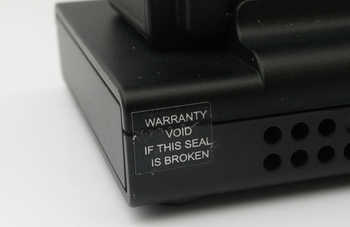
On first glance there is no obvious way in, but the give-away is the small label on the foot.

Turning the t180 over reveals the base and four rubber feet. If you remove the two rubber feet at
the same end of the base as the 'Warranty void' label it reveals two screws that are holding the bottom
of the base in place. Remove these two screws and then you will find the bottom of the base slides off.

This reveals the wireless dongle and the two screws that are holding the foot to the body of the t180.
Unplug the cable from the base of the t180 and undo the two retaining screws.

This reveals the bottom the case. Remove the two black screws.

At this point using a flat bladed screwdriver or similar you can carefully work round the edge of
the case to remove the side panel.
Having got as far as revealing the bottom of the circuit board (photo) I removed the four screws that hold it in place and that's where I stalled. I could see no way to proceed further without potentially damaging the case. Anyway, as far as I'm aware, both the flash and RAM are soldered to the board and can't be changed.