

 I decided to add this section after receiving a couple of emails on the subject and also because I finally
won my battle to get into the password protected BIOS of the Precedence TXC3.
I decided to add this section after receiving a couple of emails on the subject and also because I finally
won my battle to get into the password protected BIOS of the Precedence TXC3.
In February 2024 I heard from Robin who had faced this problem on a UEFI system. His struggle with it is documented in Recovering the BIOS password from a Panasonic CF-U1 mk2 (AMI Aptio UEFI).
They are there to prevent unauthorised people tinkering with the settings. For example you would want to lock-down a publicly accessible computer and prevent anyone booting alternative software from a USB pen drive. Similarly corporate IT departments might want to restrict what their users can do with/to the Corporate IT machinery.
There are two parts to this:
This is one of those legacy areas that dates back to 1984 and the original IBM PC and is still broadly the same. The original IBM PC used a Real Time Clock (RTC) chip made by Motorola - the MC146818. The RTC was set/read via a couple of IO ports and appeared as a 64 byte RAM, the first 14 bytes of which were the registers of the RTC. This left 50 bytes of spare RAM.
So that the PC didn't lose the time every time it was powered off the (low power) RTC chip was connected to a small onboard battery that kept it powered up and running whilst the PC itself was powered down. As a result the 50 bytes of now non-volatile RAM (NVRAM) was used by the BIOS to store configuration information that needed to be retained whilst the machine was switched off. (Note: Modern day flash memory didn't exist at this time).
In those days the prevalent semiconductor technology was TTL, but the much lower power (but then slower) CMOS devices had been introduced. The RTC, because of it's low power requirement, was manufactured using CMOS technology. As a result the BIOS data storage area is referred as the CMOS or the NVRAM. These days exactly the same functionality (and programmatic interface) is built into modern Southbridge chips and is used for the same purpose.
In the early days the BIOS stored the full password in the NVRAM. Subsequently it was 'encrypted' (loose use of the term!), and finally, for better security and to save on storage space, the BIOS ended up storing a 16-bit hash of the password.
FYI: A hash algorithm processes a larger input and reduces it to smaller hash/digest/fingerprint/whatever of that input. In this case we reduce say an 8-character password down to two bytes (16 bits). A strong algorithm ensures that you can't get back to the original password and that there are likely to be minimum chances of collisions (different inputs resulting in the same hash). Most BIOS hash algorithms are not particularly strong from a cryptographic perspective.
Some early Bioses (reputedly) had back-door passwords that worked irrespective of any user-set password. Some modern ones have a built-in default password. This is often used by specialist manufacturers such as Wyse and Neoware where the hardware is not intended as a general purpose computer. If you're lucky these passwords are publicly known: Fireport for Wyse and DOGBITES for Neoware for example. If they aren't, you may have to go digging in the BIOS to see if you can find the hash algorithm that it is using and the hash value that it is looking for.
Laptops are a bit different. Most do not have any separate battery-backed NVRAM and they often use a bit of flash memory for the same purpose - something unique to a particular brand.
Strictly speaking this password mechanism is more of an inconvenience than a strong security mechanism.
16-bits is 65,536 possible hashes. These days that's not a lot and, if you know the (usually simple) hashing algorithm, any seed value and a hash, an exhaustive search can usually produce one or more matching passwords in under 10 seconds.
The first step is to try clearing the NVRAM. This works because the data in there is protected by a checksum. On power-up the BIOS checks this and, if it is wrong, it ignores the current contents and overwrites it with a basic set of default values. These usually do not include any requirement for a user to enter a password.
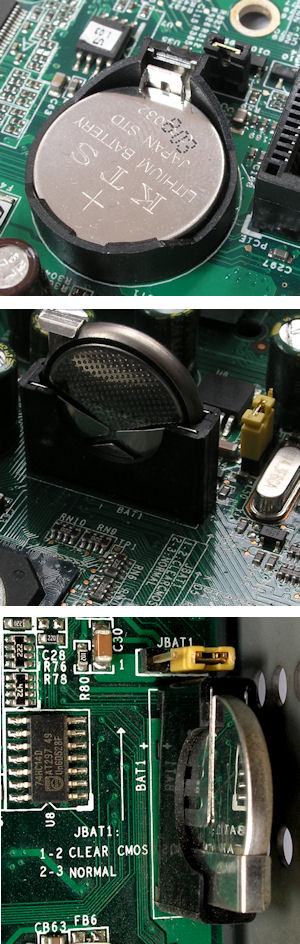
Looking at the motherboard you should be able to see a button style battery somewhere, either flat on the board or mounted vertically in a holder. If you're lucky, near it will be a 3-pin header. Sometimes there's a 2-pin header. These headers are often labelled JBAT, CLR CMOS or similar. Often there are some words nearby silk-screened onto the board to tell you what to do.
Start by ensuring the thin client is powered off. (It's probably best to remove the power lead).
With a 3-pin header it is normally just the case moving the shorting link briefly to the other side before returning it back to where it was. Essentially you are disconnecting the power to the NVRAM (centre pin) from the battery and connecting it to ground. This clears the RAM immediately. In some of the pictures you can see the helpful words printed on the board:
          JBAT1
	 1 - 2  CLEAR CMOS
	 2 - 3  NORMAL
With a 2-pin header you are just disconnecting the power to the NVRAM. In this case it is advisable to wait for 30 seconds or so to allow any charge to leak away and the contents of the RAM to become corrupted.
If there is no obvious link you'll have to remove the battery. In this case, once I've removed the battery, I usually short out the contacts on the battery socket with a screwdriver blade before replacing the battery. This effectively pulls the power rail to ground and ensures that the RAM loses its contents. If you don't do this you need to leave the battery out for a short while to ensure any stored charge leaks away and the supply voltage to drops to a point where the contents of the RAM become corrupted.
Power up the thin client and head for the BIOS. If you're lucky you'll be in without any prompt for a password.
If you are still getting a prompt for a password then there is a generic password built into the BIOS. This was either what was being asked for in the first place, or has now taken over from the previously set user password.
Hopefully Google will be your friend here and you'll find it somewhere on the internet. If not all may not be lost.
A lot of thin clients I've seen use the Phoenix Award BIOS 6.00. With this particular BIOS there is a flag in the BIOS CMOS data that tells it that there is a password set and that it should prompt for a password. All you have to do is reset this bit. To do so you obviously need to able to boot some kind of operating system so that you can get at the CMOS - if you can't run anything without the password you're in for a hard time.
For the Phoenix Award BIOS 6.00 the following information is useful. In the CMOS data:
Offset Details 11 Bit 1 of this byte is set if a password is required. 1C-1D Holds the 16-bit hash of the password 2E Holds the MSB of the 16-bit checksum of bytes 0E....2D 2F Holds the LSB of the 16-bit checksum of bytes 0E....2D
You can either patch these by hand or use a small program similar to the one I wrote which is described here.
Note: Experiments with the Precedence TCX3 shows that this only works after the CMOS has been cleared by using the hardware method of removing the battery or moving the CLR CMOS link, and before you first enter the BIOS setup screens. My best guess is that the BIOS is shadowing the CMOS data elsewhere and, once you've been into the BIOS setup screen, this shadowed version is created and takes priority. If you change/corrupt the CMOS data after this it is automatically restored the next time you reboot. Removing the battery or moving the link ensures both copies are destroyed.
The Precedence BIOS also uses 30-3F (not checksummed as far as I can see) and 40-7C to store data. The 40-7C area is checksummed in a similar manner to the 0E..2D range with the checksum of 40...7A being stored in locations 7B and 7C. Byte 48 changed from 04 to C4 when a password was set, whilst the byte at 3E changed from A2 to AA.
If you have a different BIOS try a little bit of investigation - which is what I ended up doing before creating my clrpwd program. I have the advantage of having a number of thin clients here which makes step 1 easy for me...
I used the program nvramtool from the coreboot website to dump the contents of the CMOS.
I did this on an Igel thin Client of a similar age to the TCX3 which also had a Phoenix/Award BIOS. From this I could see changes in bytes 11/1C/1D/2E/2F and it was soon obvious what was going on. Also, if I want to chase down the password hashing algorithm, I now have the known password/hash pairs:
password hashes to 00 76
passworD hashes to E0 C5
12345678 hashes to C4 71
If the enable/disable password flag hadn't shown up I would have tried using one of the hashes above in an attempt to set a known password in the TCX3 CMOS although my subsequent discovery of the possible 'shadowing' means this may not have worked.
If all else fails you'll have to start disassembling the BIOS to find out what is going on. With an old BIOS this may not be too difficult as you've just got a block of code in a 64K or 128K ROM. With a modern one it is hard going.
For example the BIOS for the Precedence TCX3 is stored in a 512KB flash memory. It comprises many sections most of which are stored in a compressed form, so step one is to expand the various bits into their individual components. Of these one is the basic 128KB BIOS that is there when the system is running. However there is the original boot code, the decompression code, the BIOS setup code.... which are transitory and loaded into various other areas of RAM whilst the system is starting up/initialising. To cope with multiple languages all the system text is stored in a separate compressed file which is indexed in some indirect fashion. This means you can't just find the string with "password" in it and then using its offset address find code that prints out that prompt....
I don't know if the code is just complex or an extra layer of obfuscation has been added.
If you have any interest, my success with the Precedence BIOS came when I switched to looking for code that was doing stuff with the CMOS - reading/writing to ports 0x70 and 0x71. I found a short segment that put 8 bytes into the area 0xE0..0xE8. Those eight bytes turned out to be the disguised default password. What's also interesting is that area of the CMOS appears to be blank - so I don't know where it's actually being stored - but I no longer care.
The Linux flashrom tool can be used on a lot of systems to save the contents of the BIOS chip to a file.