


This Netvoyager thin client is a small and neat unit which is discretely identified on the label as the LX1010. It would appear to have been launched at the beginning of 2006. I haven't been able to discover when it was discontinued.
My summary:The Netvoyager LX-1010 is an enterprise level thin client based on Netvoyager's operating system, Lithium. It is ideal for the most demanding thin client users that require more protocol support and features. The LX-1010 supports remote applications on Citrix ICA, Microsoft RDP, X-Windows, Tarantella and VNC servers as well as terminal-based protocols such as Telnet and SSH.
The LX-1010 also includes a built-in browser based on the popular Firefox engine with Java, JavaScript, Macromedia Flash and Adobe PDF reader.
In addition to high performance, the LX-1010 supports external USB floppy drives, hard drives and flash drives, making it a very flexible thin client solution.
A very portable and slim device, consuming a maximum of 20W (at peak CPU performance - compared to an average PC consuming 300W).
Processor Type
SpeedVIA Eden
800MHzMemory Flash
RAM128MB
256MBVideo Chip
Max resolution??
1600 x 1200 24-bit colourPorts Network
USB
Serial
Parallel
PS/210/100
2 x USB2.0
0
0
2 (Kybd & mouse)Power Plug
Off
Running5V
4/7 W
~20WDimensions H x W x D (mm) 38 x 170 x 124 The embedded operating system is Lithium.
For those to whom it matters here is some detail from Linux's /proc/cpuinfo
vendor_id : CentaurHauls cpu family : 6 model : 9 model name : VIA Nehemiah stepping : 10 flags : fpu vme de pse tsc msr cx8 sep mtrr pge
cmov pat mmx fxsr sse rng rng_en ace ace_en
00:00.0 Host bridge: VIA Technologies, Inc. VT8623 [Apollo CLE266]
00:01.0 PCI bridge: VIA Technologies, Inc. VT8633 [Apollo Pro266 AGP]
00:10.0 USB controller: VIA Technologies, Inc. VT82xxxxx UHCI USB 1.1 Controller (rev 80)
00:10.3 USB controller: VIA Technologies, Inc. USB 2.0 (rev 82)
00:11.0 ISA bridge: VIA Technologies, Inc. VT8235 ISA Bridge
00:11.1 IDE interface: VIA Technologies, Inc. VT82C586A/B/VT82C686/A/B/VT823x/A/C PIPC Bus Master IDE (rev 06)
00:11.5 Multimedia audio controller: VIA Technologies, Inc. VT8233/A/8235/8237 AC97 Audio Controller (rev 50)
00:12.0 Ethernet controller: VIA Technologies, Inc. VT6102 [Rhine-II] (rev 74)
01:00.0 VGA compatible controller: VIA Technologies, Inc. VT8623 [Apollo CLE266] integrated CastleRock graphics (rev 03)
 The unit requires a 5V supply. It uses a odd three-pin socket for the power connection -
see photo right. My LX1010 came without
a power unit. I ended up soldering a couple of wires to the PCB and connecting it
to and old PC power supply via one of the molex connectors. What ever you do note
that 20W means the unit can draw ~4A. This means you need a PSU capable of delivering
that current and whatever lash-up you use to connect the power needs to be of
a suitably low resistance.
The unit requires a 5V supply. It uses a odd three-pin socket for the power connection -
see photo right. My LX1010 came without
a power unit. I ended up soldering a couple of wires to the PCB and connecting it
to and old PC power supply via one of the molex connectors. What ever you do note
that 20W means the unit can draw ~4A. This means you need a PSU capable of delivering
that current and whatever lash-up you use to connect the power needs to be of
a suitably low resistance.

 This is not an easy task - and you are stuck with 256MB of RAM. The top and bottom of
the case are solid aluminium heat sinks held on by four screws. You will need a suitably
sized allen-key to remove these. Also note what you remove from where - the long screws
come from the right-hand-side (looking from the front) whilst the short screws come from the left. The ones from
the left also have different sized threads depending on whether they are from the top or the bottom.
This is not an easy task - and you are stuck with 256MB of RAM. The top and bottom of
the case are solid aluminium heat sinks held on by four screws. You will need a suitably
sized allen-key to remove these. Also note what you remove from where - the long screws
come from the right-hand-side (looking from the front) whilst the short screws come from the left. The ones from
the left also have different sized threads depending on whether they are from the top or the bottom.
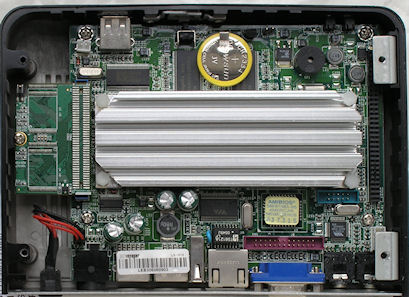
Usually you need to remove the top cover to get into thin client hardware, but, in this case, I would start with the bottom cover. I've tried to show the reason in the photograph (right). A large heatsink spans the circuit board and this appears to be fixed to the top cover by double-sided tape (or some thermally efficient equivalent). The red arrow indicates the heat sink whilst the yellow arrow is pointing to the adhesive layer between it and the top cover.
Flash: The Flash memory is replaceable. It's a DOM plugged into a standard 44-pin IDE connector. It's on the right in the picture showing the bottom view of the circuit board and on the left in the picture below showing the upper view. In view of the space considerations I would guess that you're stuck with a standard DOM should you decide to repurpose the LX1010 and need more memory.
I removed the DOM and connected a short 44-pin cable to the socket to test out some alternative operating systems. This is a little bit fiddly as the socket is facing down into the case and there is limited space in which to manipulate things. However the IDE connector is a proper socket with a key-way notch on the edge so this does help locate the cable connector despite having to work blind. Obviously life is a lot easier if you have separated the top cover from the heat sink.
RAM: I assume the RAM is soldered onto the motherboard. Peering through the gaps around the various sockets on the rear I couldn't see any SODIMM and I haven't tried to separate the top cover from the heatsink to get a better look.
 I've just acquired a few more LX-1010s with power supplies. With these there has been a small
change to the way they are packaged and this time it is possible to lever off the top cover - in
fact this is now the way you have to do it. An obvious external difference between the two models
is the way in the fins on the cover are orientated. With this version (take the top off) they run
from front to back whilst with the previous version (take the bottom off) they run from side to side.
I've just acquired a few more LX-1010s with power supplies. With these there has been a small
change to the way they are packaged and this time it is possible to lever off the top cover - in
fact this is now the way you have to do it. An obvious external difference between the two models
is the way in the fins on the cover are orientated. With this version (take the top off) they run
from front to back whilst with the previous version (take the bottom off) they run from side to side.
Anyway, if you decide to dismantle one, I suggest you take care. Undo the two small screws and move the back panel to one side remembering it will still be attached to the pcb by the cables running to the on/off switch. Peer in at the left-hand side where the switch is connected and the DOM is mounted. Either use the DOM mounting (screw facing cover to remove) or on/off switch connector (on the 'top' side of the PCB) to help you pick the right cover to remove.