

This is simple and straight forward. All you need is small flat-bladed screwdriver.
 Turn the 3040 over and look at the rear corner by the power socket. There you
will find a slot that will take a screwdriver blade. Press down into it and
then gently pop the base out. You need to get the rear edge free first
and then move the base towards the rear to remove it.
Turn the 3040 over and look at the rear corner by the power socket. There you
will find a slot that will take a screwdriver blade. Press down into it and
then gently pop the base out. You need to get the rear edge free first
and then move the base towards the rear to remove it.
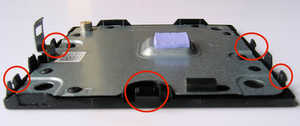 This is looking at the base from the rear. On the left you can see the screwdriver slot.
Circled in red are the clips that hold to the top in place.
This is looking at the base from the rear. On the left you can see the screwdriver slot.
Circled in red are the clips that hold to the top in place.
 This is looking at the base from the front. Here you can see circled in red two slots
that lugs from the case fit into. As you remove the base it pivots about this edge
until the slots become clear of the lugs.
This is looking at the base from the front. Here you can see circled in red two slots
that lugs from the case fit into. As you remove the base it pivots about this edge
until the slots become clear of the lugs.
There is no need to remove the feet.
Often the feet are used to conceal the screws that are holding the case together - not so with the 3040. I made the mistake of starting this way.
 The feet are top-hat shaped and on assembly are dropped into place before a metal shield
is fixed inside the case. The shield is held in place with plastic posts where the tops
are subsequently melted.
The feet are top-hat shaped and on assembly are dropped into place before a metal shield
is fixed inside the case. The shield is held in place with plastic posts where the tops
are subsequently melted.
Not wanting to damage the fixings I found that it was possible to put the feet back with gentle encouragement from a small flat-bladed screwdriver. Adding a small amount of lubricant to the 'brim' of the foot helped.