

 In October 2018 I heard from 'ontheground' who had put
together an Internet Radio solution as an add-on to his home stereo system. It was based on the old
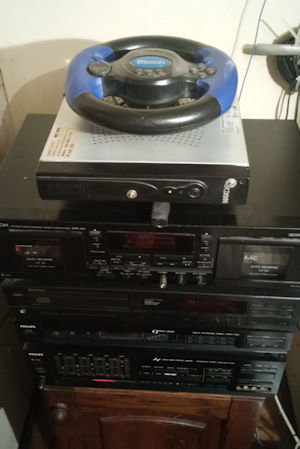
Damn Small Linux (DSL) distribution along with an old Igel thin client and a USB gaming steering wheel.
His setup is shown in the photo.
In October 2018 I heard from 'ontheground' who had put
together an Internet Radio solution as an add-on to his home stereo system. It was based on the old
Damn Small Linux (DSL) distribution along with an old Igel thin client and a USB gaming steering wheel.
His setup is shown in the photo.
The thin client is an Igel Compact 364 (relabelled as Maxdata 200) with which has a Winnet G250 v1.2 motherboard inside, Via Eden Samuel 2 400MHz CPU, 64MB CF card in a CF-IDE adapter and 128MB/100MHz SD-RAM.
As he notes:
It will be suitable for other thin clients(Igel and others too) with any processor, any video board, any sound card that the Damn Small Linux knows, because the hardware detection and installation takes place at boot with a Knoppix style behaviour. You only need a CF card and a CF reader or an IDE HDD (with notebook IDE-Desktop IDE adapter, if the thin client needs this) to deploy the image to the system.Once set up you can hook it with a suitable cable to your amplifier or active speakers and throw it on top of your HIFI system as an add-on to it, like I did with mine.
Note: The last DSL release was back in 2008. It works well on hardware from that era. It knows nothing about more modern components such as current chip sets or gigabit ethernet controllers so you may have problems in that area with recent hardware.
Uses Damn Small Linux with its built in XMMS music player to access internet radio via the LAN.
Installed with frugal install (see the DSL Wiki). This primarily runs from RAM - nice with Compact Flash cards (no or very little wear on them), but also works on IDE HDD-s.
You have to do some additional work configuring DSL to get the setup to work from a pen drive.
Note: XMMS, like DSL, is old technology. According to Wikipedia the last release was back in November 2007. However this article is a nice example of how old technology can still be pressed into use today.
There are various ways you can set the unit up and use it:
- If you've hooked it up to screen and keyboard then there's a GUI, but this is not really needed for normal operation.
- In this particular instance it is being run headless (no screen and keyboard) and being controlled by an old gaming steering wheel. (Novel!). When run in this mode it is configurable remotely via SSH and SCP - in which case you'll need to know the unit's IP address which can always be found in your router's DHCP table.
The default configuration user account is root with a password of radio.
It plays the internet radio playlist from /home/dsl/.xmms directory, called xmms.m3u, but only use this filename.
Playback can controlled by a keyboard or an USB joystick / game-pad / steering wheel (via XMMS joystick plugin). His used the last one as he had a faulty (but still usable for the project) PC steering wheel to hand.
The mentioned directory also contains some configuration scripts to make life easy in managing your xmmsm3u play list. If you update this file then the system needs to be rebooted for the changes to take effect.
As mentioned above you can run these remotely over SSH using your preferred SSH client such as Winscp or putty .
64 MB Compact Flash/ IDE disk image (but works on bigger capacity drives/cards too). Download
Windows program to write the above image to a CF card/ IDE DISK from hddguru web site. (Alternatively you can use the linux dd command).
For the flash drive version you can use rufus to write the image to the flash drive. (See the included readme.txt file). Download.
If you install it on bigger drives you can use the space above 64 MB by formatting that space as FAT32 or ext2 with any partitioning program.
If using the image file you probably need to change the XMMS joystick settings via the GUI as they are currently set for the USB steering wheel. The numbered function keys on the steering wheel are used for play-pause/stop/next station/previous station/+10 station/-10station operations.
IRDA remote controlling may be possible, hasn't been tried.
The 64MB image above has been set up for a hungarian keyboard. You will need to edit the /opt/bootlocal.sh to fix this. The line that needs editing is: loadkeys hu. Having done this you need to run one of the 'save' script files mentioned earlier to preserve the changes.
With this particular hardware the client forgets time on boot. ontheground made a work-around for that by adding the ntpdate program to the image and the line: sudo /opt/ntpdate.sh to the bootlocal.sh script file. This updates the system date/time via NTP. You can change the preset NTP server by editing the /opt/ntpdate.sh file.
Article provided by 'ontheground'.