
Background
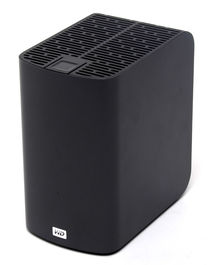
In May 2020 I got hold of a Western Digital My Book Live Duo that had been advertised as "powering up but not visible on the network". It came without a PSU and without any hard drives and cost me £10 delivered.
Google found me a fair amount of information on 'unbricking' the Duo (see Resources at the end). As is common with products of this ilk the system firmware is stored in a partition on the hard drive(s). Should the system become corrupted and fail to boot properly, or should you install new hard drives, there is apparently no simple bootstrap method to (re)install the original firmware. The only solution is to pre-format the hard drives on another system before installing them.
What follows here documents my exploration of the My Book Live Duo ending up with the installation of two 1TB Western Digital drives. It differs from the approach described elsewhere in that I initialise the two new drives at the same time.
My Book Live Duo Status
The My Book Live Duo was launched by Western Digital back in January 2012. It has now reached the end of its service life (EOSL) and is no longer supported, but downloads are still there on the Western Digital Support Site.
I don't know when support was finally pulled, but the last firmware released was Version 02.43.10 - 048 dated 6/22/2015.
First steps
After my Duo arrived I plugged it into my network, powered it up, and nothing happened other than the front panel LED changed colour after a short delay. Wireshark (a network monitor) showed no activity on the network. The fact that LED changed colour gave me hope that the Duo was alive and well and doing something.
Next I took the Duo to pieces, something that I subsequently discovered was completely unnecessary. Anyway it allowed me to take some photographs of the circuit board and to identify where I could connect a serial console. The board already carried a connector for the serial console and this was accessible from the top of the unit - so there was no need to dismantle it to utilise this!
It turned out that I happened to have a Micro JST connector of the right size to connect to the serial port on the motherboard. I also had a USB-to-Serial interface that I wired up to the plug.
With the serial console connected up I could see that the My Book Live Duo was booting up, but then went no further as it couldn't find anything to load and run - not surprising as there were no hard drives fitted.
You'll find details of the hardware and how to connect to the serial port here.
Second steps
Having demonstrated that it was working and that I had a way of monitoring what was going on I had a scrabble round and I dug up:
- An old 250GB SATA drive that had seen better days.
- A USB to IDE/SATA adaptor that's useful for checking out disk drives.
I also went on-line to the Western Digital support site and downloaded the last release of the My Book Live Duo firmware.
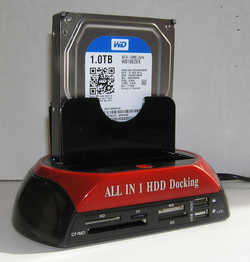
Subsequently, when I'd proved I could get the Duo hardware running again, I went onto Amazon and bought 2 x 1TB Western Digital drives to fit.
At this stage I played around with the 'debrick.sh' script and my 250GB drive to get an idea of what was going on. I did get the Duo up and running with the single drive, and subsequently with two drives. In each case I ended up with a running system, but watching what was going on via the serial port whilst the system booted made me realise that all was not quite right at the system level.
This moved me on to stage three - developing my own rebuild script.
Notes & Hindsight
Using the serial port on the Duo is not essential to bringing it back to life. However it is useful to see some of what is going on and can give you confidence that you are moving in the right direction.
 The various debricking guides talk about partially dismantling
your main PC in order to
be able to connect the Duo's hard drives to it so that you can rebuild them. However I have
a fair amount of technology lying around and so I initially went with using an external USB/SATA
docking station. I realised my error the first time I ran the debricking script. Its last action
is to restore a 2GB partition on the disk. My docking station is fairly old and I found that it
takes quite a while to do this over a USB2.0 link. It prompted me to take the time to find an old
PC of mine and setup a system where the disk(s) being rebuilt were plugged directly into
the SATA ports on that hardware.
The various debricking guides talk about partially dismantling
your main PC in order to
be able to connect the Duo's hard drives to it so that you can rebuild them. However I have
a fair amount of technology lying around and so I initially went with using an external USB/SATA
docking station. I realised my error the first time I ran the debricking script. Its last action
is to restore a 2GB partition on the disk. My docking station is fairly old and I found that it
takes quite a while to do this over a USB2.0 link. It prompted me to take the time to find an old
PC of mine and setup a system where the disk(s) being rebuilt were plugged directly into
the SATA ports on that hardware.
As a fallback I also tracked down some more up-to-date SATA-to-USB adapters that run at USB3.0 speeds. (At the time of writing still in transit from China).
Details
Rather than produce one very long page, I've broken down the various descriptions to particular topics:
- The Duo hardware (and serial port).
- Disk Partitions
- Old Debricking script
- Rationale for new approach
- New Rebuild script
- superblock.c program.
- Linux environment
- Do the rebuild
Resources
Western Digital Support SiteWestern Digital Forum
Unbricking Guide
MyBookWorld