
Rebuilding
Get the firmware
Download the last firmware release for the Duo from Western Digital's support site. The file (ap2nc-024310-048-20150507.zip) is a compressed nested archive and a good way of opening it is with 7zip. The native unzip in Windows 10 stalls early on as it only operates on files with standard extensions (eg .zip) whilst 7zip is more intelligent and recognises other formats.
With 7zip the unpacking goes:
ap2nc-024310-048-20150507.zip -> ap2nc-024310-048-20150507.deb -> data.tar -> . -> CacheVolume -> Upgrade -> (list of 8 files)
Extract these files to a directory of your choosing. The file you need from this lot is rootfs.img
Prepare the Update Environment
Find a USB flash drive to hold the Linux system or Linux-based 'rescue' packaged system and data files. There are many 'live' distributions available that are designed to be transferred to CDROMs and so are <700MB in size. (Tiny Core Linux is only 20MB). As the Western Digital firmware file is ~2GB in size a minimum size of 4GB should suffice.
Pick the Linux distribution you are going to use and use a program such as LiLi (Linux Live USB Creator) to install it onto the flash drive.
If you haven't used my prepackaged version of Tiny Core you will need to create a directory named wd on the flash drive and copy over superblock.c, rebuild.sh and rootfs.img to it and then compile superblock.c. With the prepackaged version this has already been done and you'll only have to add the (2GB) rootfs.img file.
In constructing the Tiny Core version I added the following packages:
- kmaps.tcz
- bash.tcz
- e2fsprogs.tcz
- mdadm.tcz
- raid-dm-5.4.3-tinycore.tcz
- parted.tcz
If you're playing around with things and wish to compile you own version of superblock.c you will need to add compile.tcz.
Assemble the hardware
 As mentioned earlier I started off using an external USB connected SATA docking station but then
switched to using an old Shuttle PC of mine. (Interestingly enough my main PC, a small Shuttle XH61V, has
no provision for 3.5" disk drives). Depending on your expertise, if you are pressing your main PC
into service, there is something to be said for temporarily disconnecting all its internal drives.
That way you can be sure that you can't overwrite them by mistake. (You might need to do this
anyway depending on the number of SATA ports on your motherboard).
As mentioned earlier I started off using an external USB connected SATA docking station but then
switched to using an old Shuttle PC of mine. (Interestingly enough my main PC, a small Shuttle XH61V, has
no provision for 3.5" disk drives). Depending on your expertise, if you are pressing your main PC
into service, there is something to be said for temporarily disconnecting all its internal drives.
That way you can be sure that you can't overwrite them by mistake. (You might need to do this
anyway depending on the number of SATA ports on your motherboard).
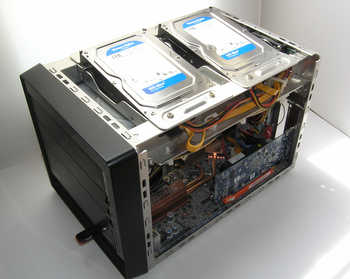
With this particular Shuttle model the drives sit in carriers on the top of the chassis. I removed the drive and SSD that were there and replaced them with my two 1TB Western Digital drives.
You can see my USB flash drive bottom left in the photo. It's plugged into one of the front USB ports on the PC.
Run the update
Having put everything together boot Linux from the USB flash drive and open a terminal. With my particular setup the two 1TB drives appear as sda and sdb. The USB flash drive appears as sdc. One way of seeing what's happened on your system is to look in the system log file using dmesg and grep to find the lines of interest in its output. I've highlighted the key points in red in the example below:
dmesg | grep sd
Once you're confident that you know which are the drives you need to format it's time to do it:
cd /mnt/sdc1/wd
sudo ./rebuild.sh sda sdb rootfs.img
The script carries out a few simple checks and then uses parted to print out the details of the two drives it is about to reformat. This is a final sanity check that you're doing the right thing. Hit y (twice) to continue:
Output from prog whilst it runs
Hopefully went as it should and you can now shut the system down and disconnect the disk drives.
Finishing off
Transfer the drives to My Book Live Duo. The contents are identical so it does matter which goes in which slot.
Power up the Duo. If you're not monitoring the serial port, after about ??seconds the light on the front turns (what colour?). It should appear on your network. One way of finding out if it's there is to logon to your router and look at its list of attached devices. If you're monitoring the serial port you can logon as root with the password welc0me and use ifconfig see what IP address it has been assigned.
Point a browser at it and you should get the opening screen. Tick the box that says you accept the T&Cs and then go to Settings and do a factory reset. I don't think it matters which you do but there is no harm in going for the full factory reset option.
The Duo will reboot and you should find you have a fully running system with a Raid 0 configuration and (in my case with 1TB drives) 2TB of storage available. You can then use the UI interface to switch it to Raid 1 if that is your preference.
If you want to enable SSH access you can do this by the pointing the browser at http://your_duos_ip_address/UI/ssh
[Go back]