

This article covers the basic installation and configuration of Tiny Core on a thin client (or any computer come to that).
For this write-up I'm using Tiny Core 8.2.1 and installing it onto a Wyse Dx0D. In practice it could be almost any thin client or a virtual machine such as VirtualBox.
My preference with such installations is to run with persistent /home and /opt directories - ie these are conventional directories held directly in the flash memory of the thin client. If you don't do this the directories are RAM based and are loaded from and have to saved back to the file mydata.tgz when the system starts up or shuts down. There is nothing wrong with this if the users don't have much data stored in their user directories, but if there is a lot (and most of it is static) then the conventional approach is best as it doesn't consume large amounts of RAM on the running system or add to the startup and shutdown times.
You will need:
This description is primarily hardware independent and assumes you have sorted out any problems there might have been in getting Tiny Core to run on your target hardware.
Life is better these days thanks to the ubiquitous USB pen drive. Tools exist that simplify transferring bootable operating systems onto them and most modern computers and thin clients will boot from them.
Note: The paths mentioned below such as /dev/sda1 are typical examples of what you'll find whilst installing Tiny Core. However they may be different in your particular environment. For example if you have two storage devices connected to the IDE or SATA ports on your thin client then the pen drive is likely to appear as /dev/sdc rather than /dev/sdb.
Having booted the system from your pen drive you may find it useful to open up a command terminal and type dmesg | grep sd to see what exactly you've got as well as mount | grep sd
tc@box:$ dmesg | grep sd
sd 0:0:0:0: Attached scsi generic sg0 type 0
sd 0:0:0:0: [sda] 31277232 512-byte logical blocks: (16.0 GB/14.9 GiB)
sd 0:0:0:0: [sda] Write Protect is off
sd 0:0:0:0: [sda] Mode Sense: 00 3a 00 00
sd 0:0:0:0: [sda] Write cache: enabled, read cache: enabled, doesn't support DPO or FUA
 sda: sda1
sd 0:0:0:0: [sda] Attached SCSI disk
sd 5:0:0:0: Attached scsi generic sg1 type 0
sd 5:0:0:0: [sdb] 4050944 512-byte logical blocks: (2.07 GB/1.93 GiB)
sd 5:0:0:0: [sdb] Write Protect is off
sd 5:0:0:0: [sdb] Mode Sense: 0b 00 00 08
sd 5:0:0:0: [sdb] No Caching mode page found
sd 5:0:0:0: [sdb] Assuming drive cache: write through
 sdb: sdb1
sd 5:0:0:0: [sdb] Attached SCSI removable disk
tc@box:$ mount | grep sd
/dev/sdb1 on /mnt/sdb1 type vfat (rw,relatime,fmask=0000,......
tc@box:$
Note: I've shortened the line output by mount
The above shows I have /dev/sda and /dev/sdb. /dev/sda is 16GB in size and currently has 1 partition on it. /dev/sdb is 2GB with a single partition on it. So I know my pen drive (2GB) is /dev/sdb with the files in /mnt/sdb1 and I'm installing to /dev/sda.
When you boot Tiny Core from the pen drive, just depending how it is configured, it may automatically search all the attached drives to find the tce directory with all the installed apps. If it does this, and you already have a previous installation of Tiny Core on the Thin Client's flash drive, you'll find it mounts /dev/sda1 in preference to /dev/sdb1 of the pen drive to use the tce directory on /dev/sda1. This will prevent you from formatting /dev/sda if you're trying to do a fresh install.
Whilst you can edit the boot parameters on the fly at the Syslinux boot prompt to add tce=sdb1 to force it use the right tce directory. A more permanent solution would be to edit the syslinux.cfg so that the boot parameters include tce=UUID='XXXX-XXXX' where XXXX-XXXX is the UUID of the sdb1 partition on the pen drive. (The blkid command will tell what the UUID is).
In the example that follows I'm installing Tiny Core in a single partition that takes up all the space on the thin client's flash drive. There is nothing that stops you partitioning the drive so that there is a small boot partition with the OS on it and a second data partition - the choice is yours.
Having booted Tiny Core from your installation media run the AppBrowser.

Download and install tc-install-GUI.

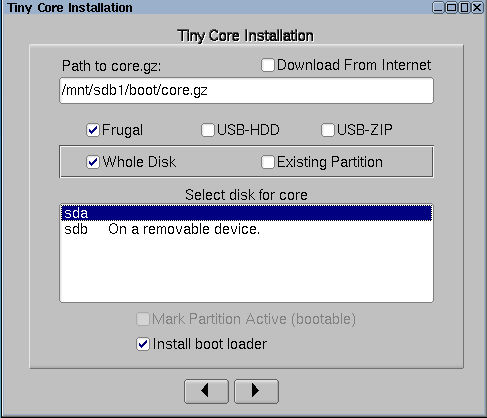
This adds a new icon at the bottom of the screen on the right. Click on it to run it. This brings up the opening screen of the installer:

Click in the white space under 'Path to core.gz' to bring up a file explorer style screen and navigate to /mnt/sdb1/boot/core.gz.
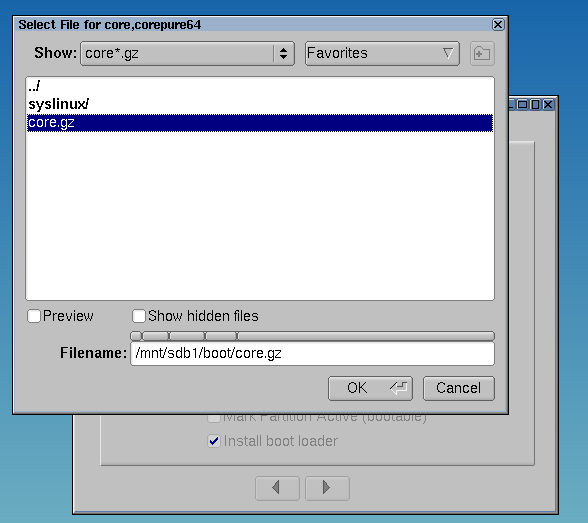
and click on 'OK'. Then tick 'Whole Disk' and select sda. The installation screen should now look like this:
Move on to the next screen accept ext4 for formatting options.

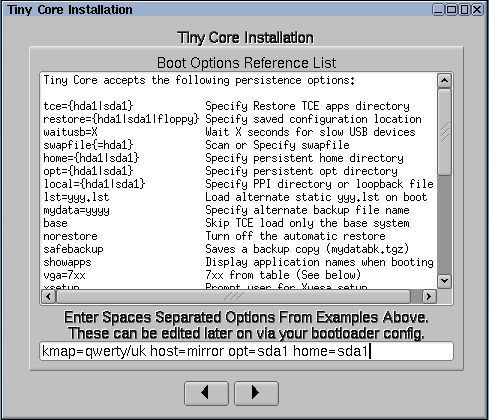
The next screen prompts for the command line options. Here you need to add at least four options:
If space is a problem you might want to consider running things in text mode. In this case add text to the command line. Alternatively tick Don't install... in the next screen. When you've entered your options:
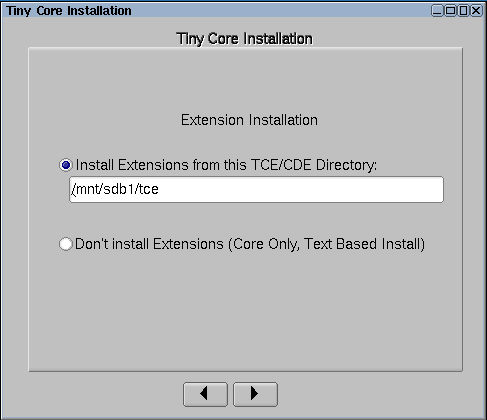
Move on to the next screen. This asks you if you want to copy over the existing installed extensions, and if so from where. As before click on the white space to bring up a file explorer style screen and navigate to /mnt/sdb1/tce:
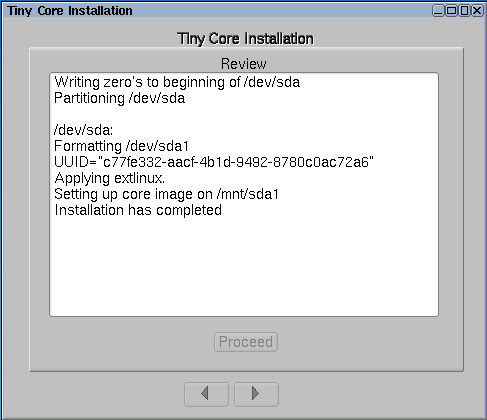
You're then shown a summary screen of what you've selected. Click on 'Proceed' if you're happy with it or else go back and make corrections where necessary.

The install proceeds and you end up with (hopefully) a successful result:
Finally reboot and remove USB pen drive once the system has shut down.
Having booted the new installation there are few simple checks you can make using a terminal. Open a terminal by clicking on the ? icon or right-click on the desktop and select....
In the terminal you type a few random keys to check that the system is properly configured for your keyboard.
Type mount | grep sd to see what you've got:
tc@mirror:~$ mount | grep sd
/dev/sda1 on /mnt/sda1 type ext4 (rw,realtime,data=ordered)
/dev/sda1 on /home type ext4 (rw,realtime,data=ordered)
/dev/sda1 on /opt type ext4 (rw,realtime,data=ordered)
tc@mirror:~$
Here we can see that all is as expected - with a persistent /home and /opt mounted on the drive sda1. In this particular case it is 16GB SATA SSD fitted to the Wyse Dx0D.
Note: The assumption I'm making here is that you've just installed a basic Tiny Core system. If you have already installed and configured other applications on the pen drive that you installed from, then you need to ensure that those changes are carried over to this installation. You'll either have to redo some of the work or think twice before following instructions like 'overwrite .filetool.lst'
First a trivial issue. For reasons I don't understand the installer keeps the 'waitusb=5' in the boot command line. This can be deleted from the configuration file (extlinux.conf that can be found in the directory: /mnt/sda1/tce/boot/extlinux/.
Next the configuration file .filetool.lst can be emptied. Currently you will find it contains opt and home which we've made persistent in our installation. Following on from this we don't yet have anything (yet) to save in mydata.gz and so the existing one can be deleted.
tc@mirror:~$ echo >/opt/.filetool.lst
tc@mirror:~$ rm -f /mnt/sda1/tce/mydata.tgz
That's basically it. You can now move on to adding and configuring those particular apps that you need for your particular application.