

In practice this section covers the approaches that various people have taken to fit hard drives/SSDs in their t610s.
As well as those here there is a contribution under the Using tab by John in Cheshire who installed a couple of drives in a t610plus chassis.
If you are interested in additional cooling you might like Attila's solution which is under the Using tab.
There is also a contribution from Kenneth who added a couple of small fans to his t610.
When Ken installed Windows 7 Ultimate x86 onto the t610 he found the 16GB flash drive didn't really provide enough storage so...
"...I just plugged in a regular mechanical laptop 80gb sata drive into the available socket and everything seems to work very well."
I note that his t610 did have the standard HP bracket in place to which the hard drive could be fitted.

Subsequently he wrote:
"...I replaced the mechanical drive with a surplus 80gb PNY SATA II SSD without any issues, and again performance is much improved, booting in half the time.."
My thanks to Ken who provided the original photographs and information for the t610. Ken can be reached via his website: qrpbuilder.com.
In June 2015 I got an email from Frank who'd recently acquired a t610. As you can see in Ken's photo above above, as standard there is a small metal bracket that is used for fitting a hard drive. If you don't have such a bracket Frank found that three cable ties would work just as well.

In December 2015 Szymon Dlugoszewski emailed me about increasing the storage in a t610. Effectively he's fitted three drives within the housing.

At the time he found he couldn't use the IDE port with HDDs bigger than 500GB but this limitation has vanished following a BIOS upgrade to K30. Also mounting this drive required him to move the internal speaker, in his case to the space at the end of the heatsink.

There is also a broadcom wireless card below the 500GB HDD with an external antenna visible on the picture above.
He added:
To keep everything cool inside I had to downvolt the CPU using BrazosTweaker application. It's important because the outer metal cover acts as a heatsink, so the heat from CPU is being transferred directly to both HDDs. After downvolting, at maximum usage of all devices, the CPU temp stays below 65 degrees Celsius (50 with enabled fan) and both HDDs below 55.

A typical IDE-to-SATA converter on eBay
In June 2016 he provided a further update:
The t610 with BIOS K30 accepts 2TB HDDs on both SATA and IDE ports (via standard SATA-PATA converter). This means I've successfully added total 4TBs of storage space into the t610. The SATA DOM port also accepts any standard half-sata SSD (after getting rid of this little piece of metal which holds the original screw), which means it is possible to mount a 256GB SSD under the SATA HDD AND keep both HDDs inside. I've also discovered bluetooth module in the default wifi mPCIe module provided by HP. I've also installed 16GB of RAM into it. It's working flawlessly.

In July 2017 Grzegorz emailed me some photos showing yet another way of mounting a SATA drive in the t610.
"I wanted to use an 2.5" HDD in my t610, but there is the problem of mounting the disk so that it stays firmly in one place. In the Mods section you offered some solutions, but I found another alternative that suits me best. I have screwed screws into the two mounting holes furthest from the SATA connector. From them I have run a strong synthetic thread to the metal parts of of the housing. The thread is strong enough to keep the disk in place, yet not strong enough to damage the SATA port."

In February 2018 Tom Leibrock emailed me some photos showing yet another way of mounting a SATA drive in the t610.
"I found my own solution for mounting a 2.5" SATA hard drive in my HP T610 thin client. I took a thick paper plate and cut a piece the same width as the hard drive, cut a notch to clear a few components and poked three holes for screws. Two screws are needed for the bottom of the hard drive and I used a screw that was already on the motherboard to mount it.
This is perfectly secure and puts absolutely no strain on the SATA connector on the motherboard and there is no chance of a string or zip tie slipping off or breaking. It also provides insulation between the bottom of the hard drive and the top of the 16 GB flash drive that was already installed."

The cut-down paper plate (or stiff card) attached to the SATA drive.

Where the drive goes. Note the two round paper spots added to the board that align with the two screws that hold the stiff card on the drive.

The drive in place.
In September 2018 I heard from Steve who had also added a hard drive to his t610.

The twist here was that the home made support bracket had been printed on a 3D printer. Steve had come across the design on the Thingiverse website, downloaded the files, and after "...an easy 20 minute 3D print..." had his mounting bracket.
In June 2019 I heard from Terrence who had come across this page whilst searching for a bracket to mount an SSD in his t610. It prompted him to have a look around to see what he had to hand.
My solution uses an unused divider (2) from a small parts container (1). (These are often referred to as organisers.) The key thing here is the material that the divider is made from can be reformed by heat.
I trimmed the divider down to a reasonable width. The leftover is in the photo (3) - plenty left for a second attempt if your first one isn't particularly successful. I used a heat gun to shape the piece as shown below (4). I started on the drive end of the makeshift bracket. This meant that I was able to easily trim the tail end to the correct length to match up with the mounting hole on the motherboard. You can see that the tail piece is angled slightly. This is to ensure that the drive is held off of the motherboard at the correct height after the screw is tightened.

The next photo shows the bracket 'installed' on the drive. There is no need for any screws on the SSD side. I used the drive to shape that end so that it is a tight push-fit. Once the other end is attached to the motherboard the SSD is held firmly in place.

And finally here is the SSD installed in the HP t610. The bracket has just the right amount of 'give' to absorb moderate shock and still keep the drive firmly seated in the SATA connector.

In May 2020 Simon contributed his way of mounting an SSD.
 He used a suitably bent piece of Meccano to form the support bracket...
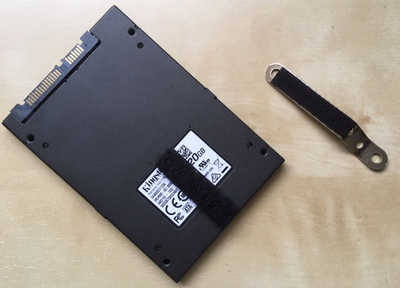 ...and attached some strips of velcro to the bracket and the SSD.
 ...fixed the bracket to the t610.....
 ...and then installed the SSD.