

Gregg in Idaho was wanting to update his S30s to the latest version of Windows CE and also the latest BIOS. I normally have little to do with stuff related to conventional use of thin clients, but as Gregg had done the hard work on this and written it down I've added it here.
The approach also applies to the S50 and S90 firmware and also can be used to just update the BIOS in an S30/S50/S90.
My thanks to Gregg for this.
I started with a standard Wyse S30 with 128MB of flash and 128MB of RAM. Under the System Info tab in the control panel it reported it was running WinCE 6.0 Wyse PFR2 (Build 656) BIOS/Boot Loader 1.15/ BL: 10.0
You obviously need an S30 (or S50 or S90) and a USB pen drive. Gregg ended up using a 1GB pen drive. I tried out both a 1GB and 2GB pen drive.
Gregg had problems along the way:
"Use a ONE GIG USB drive. I went round and round with a couple of different 4 gig and 8 gig drives, the rare times they'd boot, something in the process of pulling or pushing the BIOS and flash would fail. The one that worked for me is an old PNY Attache. Silver and purple with RED LED between the 'arms' of the silver part. They also made ones that look the same but have a GREEN LED closer to the USB connector. I have not tried that one."
I tried out both a 1GB and 2GB flash drive - both worked. However I also had problems which I eventually tracked down to:
I have no idea what's going on with (1) as the Wyse utility apparently reformats the pen drive as part of its preparation. Anyway, having rerun the USB imaging utility to create a pen drive that would only update the BIOS I ended up with something that wouldn't boot. Reformatting drive before running the utility yet again resulted in a drive that did boot.
An out-of-the-box pen drive is unlikely to have an MBR at the start. My pile of test pen drives usually do as in the past I've used LiLi to put various Linux distributions on them.
If your one doesn't have an MBR you can use Windows DISKPART tool or use something like syslinux.
I do have a copy of syslinux on my main system as it comes as part of LinuxLive USB Creator that I use.
If you have syslinux to hand the command line you want is:
syslinux -m -a X:
where X is the drive letter of your USB drive.
Alternatively, with your USB drive plugged in to your windows computer, open an administrative command prompt and follow the commands below. In my case the pen drive has appeared as Disk 2. (BTW: I've no idea what the 'Free' column is showing - I have over 400GB free on Disk 1).
Microsoft Windows [Version 10.0.14393]
(c) 2016 Microsoft Corporation. All rights reserved.

C:\WINDOWS\system32>diskpart

Microsoft DiskPart version 10.0.14393.0

Copyright (C) 1999-2013 Microsoft Corporation.
On computer: BLUETANG

DISKPART> list disk

  Disk ###  Status         Size     Free     Dyn  Gpt
  --------  -------------  -------  -------  ---  ---
  Disk 0    Online          238 GB  1024 KB
  Disk 1    Online          465 GB   101 MB
  Disk 2    Online          961 MB      0 B

DISKPART> select disk 2

Disk 2 is now the selected disk.

DISKPART> clean

DiskPart succeeded in cleaning the disk.

DISKPART> create partition primary

DiskPart succeeded in creating the specified partition.

DISKPART> select partition 1

Partition 1 is now the selected partition.

DISKPART> active

DiskPart marked the current partition as active.

DISKPART> format fs=FAT32 quick label=S30

  100 percent completed

DiskPart successfully formatted the volume.

DISKPART> ASSIGN

DiskPart successfully assigned the drive letter or mount point.

DISKPART> exit

Leaving DiskPart...

C:\WINDOWS\system32>
You only ever need to do this once.
I've no idea why this is necessary but if you're about to reuse a pen drive I suggest you:
[March 2019] Unfortunately Dell have now withdrawn support for old Wyse products and shut down the old Wyse support server: see here. As a consequence I've removed the old now dead links in the text below but left the article in case you may be able to track down the firmware elsewhere.
Visit the Wyse support site and go to the S30 download page. At the time of writing it was: https://appservices.wyse.com/pages/serviceandsupport/support/dlOraFW.asp?which=57&model=S30.
The first item is what you want:
| Firmware | Version | Notes | Posted Date | |
|---|---|---|---|---|
| 1. | 674Wye08_S46.exe (45.3 MB) |
V6.0 B674 | Wyse S30 (ROHS) Windows CE 6 WFR5 128MB build for devices with 128MB of flash. Builds can be pulled and pushed using Wyse WDM and USB imaging tools. |
20-Feb-2012 |
This is the last Windows CE build and also includes the latest BIOS. I downloaded it to my Wyse\S30 directory.
This is a self-extracting archive. When you run it you'll get a prompt for where you want the files extracted to. I have a folder named junk that I use for stuff like this. If I ever need more space I can delete anything in junk without a second thought. So, in my case, the expanded files ended up in u:\junk\s30.
To get the image onto the S30 we'll use the Dell/Wyse USB Imaging Tool. Unfortunately the Dell/Wyse website only has the latest version of this tool which doesn't work with the old files. You'll need to search round to find a version that will. Thankfully Gregg had located Version 1.19.0.4 of the USB Firmware Tool on this website
Go to Downloads and scroll down towards the bottom to find it.
I advise you to keep a copy in case you ever need it again.
As before the downloaded file is a self-extracting archive. Run it and save the files somewhere. (As earlier for me it went into u:\junk\USB_v1.19.0.4)
I'm running Windows 10. The imaging utility ran OK out-of-the-box, but if you want to see the progress bars you need to right click the EXE, select properties, select the compatibility tab and set it to Windows XP (Service Pack 3).
Navigate to the folder where the expanded USB imaging files are and double click on Wyse USB Firmware Tool.exe. After that it is a matter of following the prompts.
We want to push the firmware.

It's Windows CE (for the S30), we want to push/update the firmware and we want to do Win CE and the BIOS.

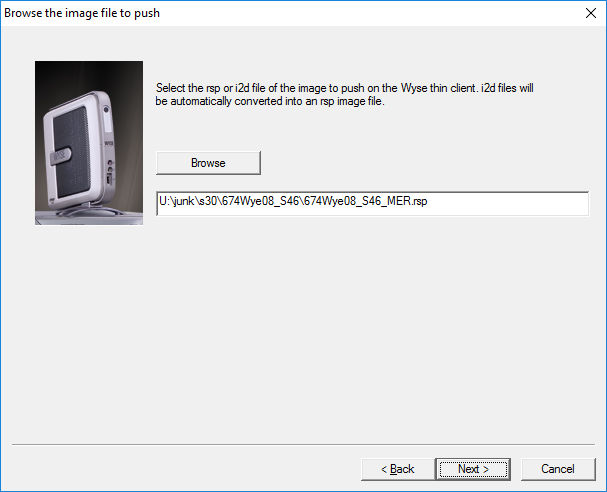
Next we're prompted for the Wyse update files. Browse to where they were extracted and select 674Wye08_S46_MER.rsp.
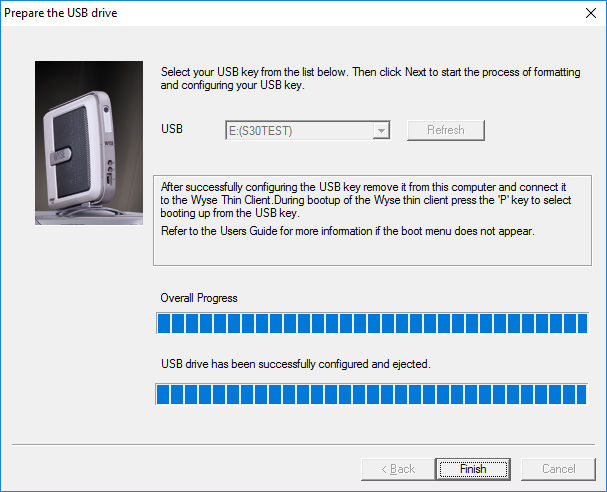
Select the USB drive

Then Run. Left to it's own devices this is what you'll get with Windows 10.
Ignore the 'not responding' comment, it will get there in the end.

Alternatively, if you've set the compatibility to Windows XP, you get the progress bars.

Finally all is done.
I found a simple approach here was to go into the BIOS, set the first boot device as USB and the remaining two to 'none'. Having saved the changes pull the power cord. Make sure the keyboard, mouse and pen drive are plugged in, plug in the power lead and press the power button.
Watch it all happen and type y at the appropriate moment.
Whilst the Wyse download says explicitly it is for the 128MB version it actually overwrites the partition table on the DOM and leaves you effectively with a 64MB DOM.
Running the Linux fdisk shows:
Disk /dev/sda: 128 MB, 128057344 bytes
4 heads, 32 sectors/track, 1954 cylinders
Units = cylinders of 128 * 512 = 65536 bytes

   Device Boot      Start         End      Blocks  Id System
/dev/sda1   *           1         977       62512   b Win95 FAT32
/dev/sda2             978         978           0   0 Empty
Partition 2 does not end on cylinder boundary
/dev/sda3             978         978           0   0 Empty
Partition 3 does not end on cylinder boundary
/dev/sda4             978         978           0   0 Empty
Partition 4 does not end on cylinder boundary