

There are a number of routes that can be followed here. The first is fairly fundamental whilst the other two leave you the option of easily returning the Evo T20 to its original state.
There is the Coreboot project that is developing minimal Linux BIOSs for various systems. If you go down this route you really need some independent way of programming the T20's BIOS chip. If you haven't, then one small error could turn the T20 into a brick. Anyway, at the time of writing, the Coreboot site does not provide any off-the-shelf code for the Evo T20 so you'll need a good level of technical expertise and time to go down this route.
The Evo's firmware sort-of follows convention in that it does have a chained boot process via a boot sector on the flash disk. The approach here is to replace the standard flash-disk based boot by the Linux boot loader Grub. This has sufficient intelligence to be able to initialise some of the Evo's hardware and boot Linux from an attached USB drive - or even do a network boot.
This approach is also described by Karl Mowatt-Wilson in (Nov 19: Dead link removed: http://www.mowson.org/karl/evo_t20/evo_t20_notes/) Notes for DSL on Evo T20 (DEvoSL). (The description is for a WinNT based Evo).
There are also some pre-packaged images that have been built by Frank Boehm and can be downloaded from here. The only rider I would add is that in the bootp.bin image I used the data in the k file is different to the k file in the standard WinCE firmware (U441_22_3CMe8.bin) and, whilst I was able to "upgrade" to Frank's software, I can't (yet) go back to the standard firmware. If I try I get:
UTC Loader.  t0.24
Initializing IDE interface...
Initializing NAND flash data...
Checking file system...
Parsing download file header...
Checking security key...
ERROR: Security key does not match.
With this approach we're only tinkering with the flash file system. The BIOS with the NETXFER mechanism is left untouched so it is still there and can be used to reload the original system image (provided the security keys match!).
When the standard WinCE firmware starts up it loads the file nk.bin into memory and executes it. nk.bin is the file that carries the Windows CE operating system. With this approach we replace nk.bin with our own version that actually holds a linux kernel (bzImage), an initial ram disk (initrd) and a small wrapper program to get them running. Once up-and-running the kernel finds the rest of the system on a pen drive that's sitting in one of the USB ports.
Building such a system is well documented by Grzegorz Swit at http://thunderlord.net.pl/evo/. [Update July 2010: Site appears to have vanished but maybe locatable on archive sites] I've successfully followed his "How To" using a Ubuntu installation as the platform from which to create the pen drive. The only change I made was to use etch in place of sarge as that is the current release. Alternatively you can alter the URLs to pick up sarge from one of the archive servers.
As above, with this approach we're only tinkering with files in the flash file system. The BIOS (along with the NETXFER mechanism) is left untouched. This is still available to re-flash new kernel builds or the original WinCE system image.
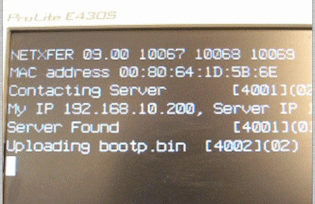 Having built your bootp.bin image on your development
machine you then use NETXFER to transfer it to the Evo T20. You need to have your DHCP and TFTP servers
running as described here.
Having built your bootp.bin image on your development
machine you then use NETXFER to transfer it to the Evo T20. You need to have your DHCP and TFTP servers
running as described here.
Reset the Evo and continually tap the P key until you see the NETXFER display at the top of the screen. If everything is ok you'll barely have time to see the messages shown in the photo before the screen clears and you start getting messages from the UTC loader. (The NETXFER messages conclude with an "Upload successful" - the screen cleared before the camera could catch it!)
If you haven't got things quite right then the error should be obvious. If it hangs without displaying an IP address your DHCP server isn't responding. If it gets an IP address and then doesn't download anything there's a problem with the TFTP server. If there's something wrong with the header of the file it will try and download it multiple times a second...
Once you've got Linux up and running from the flash/pen drive then you're ready for the next step - customisation. You can stick with what you've got and tailor the startup files and applications to meet your own personal needs and/or build your kernel to go with it.