

When my VXC-2212 arrived it wasn't immediately obvious how to get into it. In the event it wasn't too difficult but it's not a 30-second job to upgrade the RAM or DOM.
 The starting point is remove the foot - just a matter of two screws holding
it in place. Note these have torx heads. Once you're inside all you need is
a normal cross-head screwdriver.
The starting point is remove the foot - just a matter of two screws holding
it in place. Note these have torx heads. Once you're inside all you need is
a normal cross-head screwdriver.

Now to start on the case....

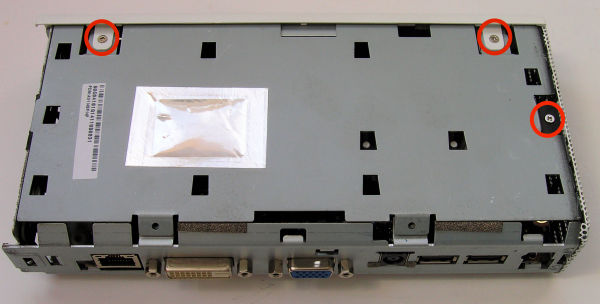
The next step is to remove the back panel. This is push fit with five lugs holding it in place - circled in red in the photo. I found I was able to remove it with some gentle persuasion. I started by lifting the end by the ethernet connector and then working along the top edge (as orientated in the photo) with a flat-bladed screwdriver.

With the plastic back panel out of the way the next step is to remove the plastic side panel. This is held in place by two screws. Once these have been undone the panel can be slid backwards and removed.
With the cover out of the way the next thing is to remove the metal screening panel. This is held in place by three screws. Once these have been undone this panel can be slid backwards and removed. Before you do so note that, on the front of edge, the screening panel slides in between the metal bracket and the plastic lugs of the front panel.

With the metal panel removed you can see the three circuit boards that comprise the VXC-2212. To get at the bottom board you obviously need to remove the top two boards. This is a fairly simple matter of undoing the cross-head screws holding them in place and removing some of the connecting cables.

I started by removing the top circuit board (power supply and rear USB sockets) and the small circuit board that carries the front USB sockets. This revealed the main circuit board and the DOM. The DOM is a standard DOM plugged into a 44-pin IDE connector.
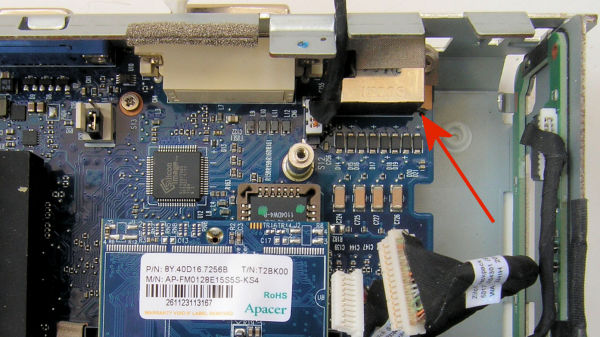
Once again removing the remaining circuit board is a matter of undoing a few screws and the pillars on the back panel adjacent to the two video sockets. However, this time there's a slight twist. To get the board out you need to pull it back to free the sockets from the back panel. I found the board was reluctant to move and subsequently discovered that, adjacent to the ethernet socket, there was a small pin pushed through the circuit board into a pillar below. (See red arrow above).

With the main circuit board out of the case you can see the pillar referred to above in the top right of the photo.

Turning the circuit board over reveals the RAM module - a standard SODIMM.
As always just reverse the procedure to reassemble the VCX-2212.