In April 2021 I heard from Jenny who had got hold of a 6772 with the intention of turning it into
a simple HTPC.
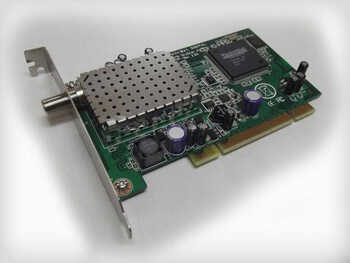
I am now in possession of a Linux based satellite TV server made from my 10ZiG 6772. I added a
SATA SSD powered from CN2, and a satellite tuner card plugged into the PCI slot.
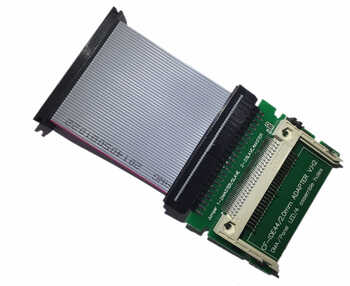
I took out the DOM and replaced it with CF adaptor which I am going to mount in such a way that
the CF card can be inserted through a slightly widened section of the original smart-card slot on
the front of the box.
All in all it's amazing just how much capability this little box really manages to pack in...
HTPC Build Notes and parts list
Software: The TV server box is running Linux. At present I'm using Amelie as this is a nice
compact distro, but it could be done with just about any distro that supports Kafeine, which is what
I am using for the DVR and viewing software. Alternatively you could use Kodi which would also allow
live viewing streams using DLNA.
Receiver:The DVB card I used is a Technisat Skystar 2
. This was chosen primarily on price as there was a vendor selling them on eBay UK for just
£4.99. Alternatively you could use use almost any PCI DVB card, or indeed a USB connected dongle.
CF Card: If you want add a Compact Flash card searching on eBay for "AMIGA 44pin to CF adapter"
will bring up numerous options. For convenience of mounting it is best to use one which is intended
for use with a ribbon cable. (If you've tinkered with old PCs you may well have a suitable ribbon
cable tucked away in your 'useful spares' box).
As the 67XX has an option for a smart card reader there are two conveniently placed supports for
that that can be used for mounting the Compact Flash adaptor board behind the card slot in the front
panel. It will obviously take a little bit of thought and some careful 'adjustments' to get your
particular adaptor to fit but should not present too many difficulties for anyone with a bit of patience
and a few basic tools.
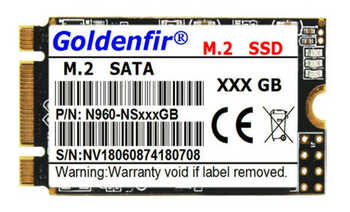
SSD: The SSD I added is a generation 3 SATA M.2 device. This offers a compact form factor
and low power consumption. (You can of course chose to use a standard SATA SSD with usual 15+9 interface).
The M.2 form factor supports a number of different interfaces and you need to ensure that your
SSD provides a SATA interface. A help here is that the SSD should have a B KEY fitting which has two
cutouts on the edge connector. Anything with a M Key (which has only a single cutout on the connector)
will not work.
Suitable devices are available on eBay for around £20. The one I used is pictured.
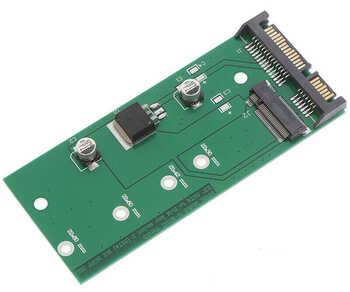
The M.2 SSD was mounted on an adaptor to allow connection to the conventional SATA connector which
is fitted to the motherboard. The power is taken from CN2. The adaptors are readily available on eBay
and Amazon and are just narrow enough to be secured in the unused space at the bottom of the case.
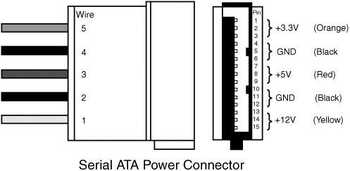
Power: For the power lead you will need to make up your own. SSDs run off 5V and so you
only need to connect the red and black leads (+5V and GND) to the appropriate pins on CN2. If your
connector is fitted with the yellow (12V) and orange (3.3V) leads these should be removed or insulated
as they are not required and you don't want them coming into contact with other tracks/components on
the board.
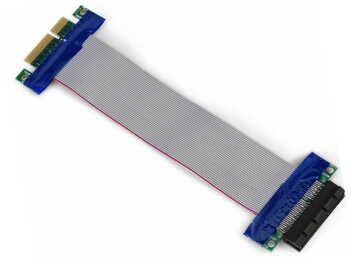
PCIe: Access to the PCIe slot is partially blocked if the PCI riser is fitted. However by using one of the
ribbon extender cables that has a male PCIe connector tongue, a length of ribbon, and then a female
connector, it is possible to connect a small PCIe device like wifi adaptor card. There should be room
to tuck this away in the space at the top of the case.