

It's not obvious how to get into the TC5D/TC5DW/TC5DX so I've described how I did it. It's not necessarily the correct way.
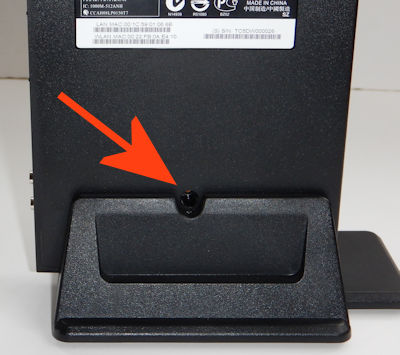
On the side of the case carrying the label you will find a screw at
the top of the cradle. Remove this screw.
This frees off the panel on the other side.

Unfortunately you'll find that only the bottom corner can be lifted slightly.
The panel is still held in place by a series of plastic clips along the front
edge and along the top.

Using a flat bladed screw driver I very carefully made my way up the left
front edge of the housing releasing the clips along that edge. (Easier to
write than do!). As I got close to the top the front panel fell off which made
life easier.
Below you can see the lugs on the front panel that are keeping it in place.


At this point you can peer in and see the first of the clips that are
holding the top edge of the case together. I freed it up with a flat
bladed screw driver, but that still left two more inaccessible clips further down
the case.

After a little thought I decided to press down hard on the side of the case
that I wasn't trying to remove whilst pushing up and wiggling the other
half of the case.
I did manage to free it off but this stage is very much 'brute force and ignorance'. If anyone knows a better way of doing it please let me know.

This shows the three lugs that the catches on the other panel click in to.
You can see that at this point I've managed to damage the lug nearest the back.
Things aren't ideal with the middle lug as that has one of the wires that goes to the WiFi aerial routed underneath it, so preventing any attempt of ours to depress it.

After this it is very straight forward. There are four screws in the corners
holding the screening cover on. You also need to remove the three black screws
(arrowed) that pass through the cover as these fix into heatsinks below. If you don't
take them off you'll pull the heatsinks off the chips when you remove the
cover.
Reassembly is just a matter of reversing the process - and is a lot easier.